DiskDigger: Ever accidentally deleted that crucial photo or important document? Yeah, been there. We’ve all lost files, and the panic that sets in is real. But what if I told you there’s a pretty rad tool that can often bring those digital ghosts back to life? That’s where DiskDigger comes in, a surprisingly powerful data recovery program that can be a lifesaver in a digital pinch.
This deep dive will explore its functionality, user experience, and even some pro tips to help you resurrect your lost files.
We’ll cover everything from the basics of using DiskDigger’s different scan types (basic and deep scans are your friends here) to more advanced techniques for recovering specific file types. We’ll also compare it to other popular recovery tools, look at its strengths and weaknesses, and address common issues you might run into. Think of this as your ultimate guide to mastering DiskDigger – whether you’re a tech novice or a seasoned digital detective.
DiskDigger Functionality
DiskDigger is a free data recovery tool available for both Android and Windows operating systems. It’s designed to recover deleted photos, videos, documents, and other file types from various storage media, including internal and external hard drives, memory cards, and USB drives. Its ease of use and powerful scanning capabilities make it a popular choice for both novice and experienced users.DiskDigger’s core functionality revolves around its ability to scan storage devices for deleted files and recover them.
This process involves identifying file signatures and reconstructing files based on the data fragments found. The software’s effectiveness depends on factors such as the type of deletion (simple delete vs. secure delete), the amount of data overwritten since the deletion, and the overall health of the storage device.
Recovery Methods
DiskDigger employs two primary recovery methods: a basic scan and a deep scan. The basic scan is faster and searches for readily identifiable file headers, making it suitable for quickly recovering recently deleted files. The deep scan, on the other hand, is more thorough and time-consuming. It analyzes the storage device at a lower level, searching for file fragments even if the file headers are missing.
This makes it more likely to recover files that have been deleted longer ago or have been partially overwritten. The choice between the two methods depends on the urgency and the extent of the recovery needed. A basic scan is ideal for quick recoveries, while a deep scan is necessary for more extensive data loss scenarios.
Comparison with Other Data Recovery Tools
DiskDigger holds its own against other popular data recovery tools like Recuva and PhotoRec, offering a balance of features and ease of use. While Recuva boasts a more user-friendly interface with advanced filtering options, DiskDigger’s strength lies in its ability to recover data from various storage devices and its availability on Android. PhotoRec, a command-line tool, offers powerful low-level recovery capabilities, but its steep learning curve makes it less accessible to average users.
DiskDigger provides a middle ground, balancing user-friendliness with effective recovery capabilities.
Feature Comparison: DiskDigger, Recuva, and PhotoRec
| Feature | DiskDigger | Recuva | PhotoRec |
|---|---|---|---|
| User Interface | Simple, intuitive | User-friendly, advanced filtering | Command-line, complex |
| Supported File Types | Wide range, including images, videos, documents | Wide range, including images, videos, documents | Wide range, but requires more technical knowledge |
| Scan Types | Basic and Deep Scan | Quick and Deep Scan | Single, powerful deep scan |
| Platform Availability | Android and Windows | Windows | Cross-platform (command-line) |
User Interface and Experience

DiskDigger’s user interface is, frankly, a bit of a mixed bag. While it gets the job done, its design feels somewhat dated and could benefit from a modern refresh to improve usability and overall user experience. The simplicity, while initially appealing, can also lead to a lack of clarity for less tech-savvy users.DiskDigger’s functionality is straightforward, but the interface doesn’t always communicate that effectively.
My experience using it involved a bit of a learning curve, mostly due to the somewhat cryptic labeling of certain options. While I eventually figured things out, a more intuitive design would have saved me time and frustration.
Interface Strengths and Weaknesses
DiskDigger’s strength lies in its simplicity. The core functions are easily accessible, and the process of scanning and recovering files is relatively straightforward once you understand the workflow. However, this simplicity can also be a weakness. The lack of visual cues and detailed explanations can leave users unsure about the implications of their choices, particularly regarding different scan types and file selection.
The interface could also benefit from better visual feedback during the scanning process, giving users a sense of progress and preventing them from accidentally interrupting the scan. A more modern, visually appealing design would also greatly improve the user experience.
Proposed Interface Improvements
My proposed redesign focuses on enhancing clarity and providing a more user-friendly experience. Imagine a redesigned main screen with clear, concise labels for each scan type (e.g., “Quick Scan,” “Deep Scan”), each accompanied by a brief description explaining the type of scan and what to expect. A progress bar with an estimated time remaining would alleviate user anxiety during the scanning process.
The file selection screen could incorporate larger thumbnails for easier identification of recoverable files, and file types could be clearly color-coded for quick visual sorting. Instead of just listing files, it could display information like file size and last modified date, offering more context. Furthermore, the option to preview images before recovery would be a valuable addition.
The overall aesthetic could be updated with a cleaner, more modern look and feel, aligning with current UI/UX best practices. This improved visual design would reduce the feeling of using outdated software. Finally, a help section with FAQs and tutorials would significantly improve the user experience, addressing common user questions and providing guidance.
Supported File Types and Formats
DiskDigger, while boasting impressive recovery capabilities, doesn’t magically resurrectevery* deleted file. Its success hinges on several factors, including the file type, the extent of data overwriting, and the storage medium’s condition. Understanding its strengths and limitations regarding specific file types is crucial for managing expectations.DiskDigger employs different recovery methods depending on the file type. For example, it uses a more robust, but slower, carving technique for files whose metadata has been lost, while it can quickly locate files with intact metadata.
This means recovery times and success rates vary significantly.
Image File Types
DiskDigger excels at recovering image files. Its broad support encompasses a wide range of popular formats, making it a go-to tool for recovering lost photos and pictures. The algorithm efficiently identifies and recovers image data, even if the file system’s index is corrupted.
- JPEG (.jpg, .jpeg)
- PNG (.png)
- GIF (.gif)
- BMP (.bmp)
- TIFF (.tiff, .tif)
- RAW (various camera-specific formats – recovery success depends on the specific RAW format and the extent of data loss)
Video File Types
Video file recovery is more challenging than image recovery due to the larger file sizes and more complex data structures. While DiskDigger attempts recovery, the success rate can be lower, particularly for heavily fragmented or overwritten videos. The quality of the recovered video might also be impacted.
- MP4 (.mp4)
- MOV (.mov)
- AVI (.avi)
- MKV (.mkv)
- WMV (.wmv)
Document File Types
DiskDigger can recover various document formats, but the success rate depends heavily on the file’s structure and the degree of data corruption. Documents with minimal metadata damage are typically easier to recover than those with extensive damage.
- PDF (.pdf)
- DOC/DOCX (.doc, .docx)
- XLS/XLSX (.xls, .xlsx)
- PPT/PPTX (.ppt, .pptx)
- TXT (.txt)
Audio File Types
Similar to videos, audio file recovery can be complex due to file size and structure. While DiskDigger attempts recovery, it may not always be successful, especially with heavily damaged files. The quality of the recovered audio might also be affected.
- MP3 (.mp3)
- WAV (.wav)
- AAC (.aac)
Limitations and Difficult File Types
Certain file types present greater challenges for DiskDigger. Highly compressed files, files with intricate internal structures, and files that have been extensively overwritten are significantly harder to recover. The recovery process might also be slower, and the recovered file might be incomplete or corrupted. For example, recovering a large, heavily compressed video file after extensive overwriting is far less likely than recovering a small JPEG image under similar circumstances.
Database files (like .mdb or .sqlite) are also notoriously difficult due to their complex internal structures.
DiskDigger’s Recovery Process
DiskDigger employs a straightforward yet powerful approach to data recovery. It scans your storage device, identifies deleted file fragments, and attempts to reconstruct them. The success of this process depends on several factors, including how thoroughly the deleted files were overwritten and the overall health of your storage medium. Let’s delve into the specifics.
The recovery process involves several key steps, from initiating the scan to reviewing the recovered files. The user experience is designed to be intuitive, even for those without technical expertise.
Data Recovery Steps
The process of recovering data with DiskDigger is relatively simple. It typically involves these steps:
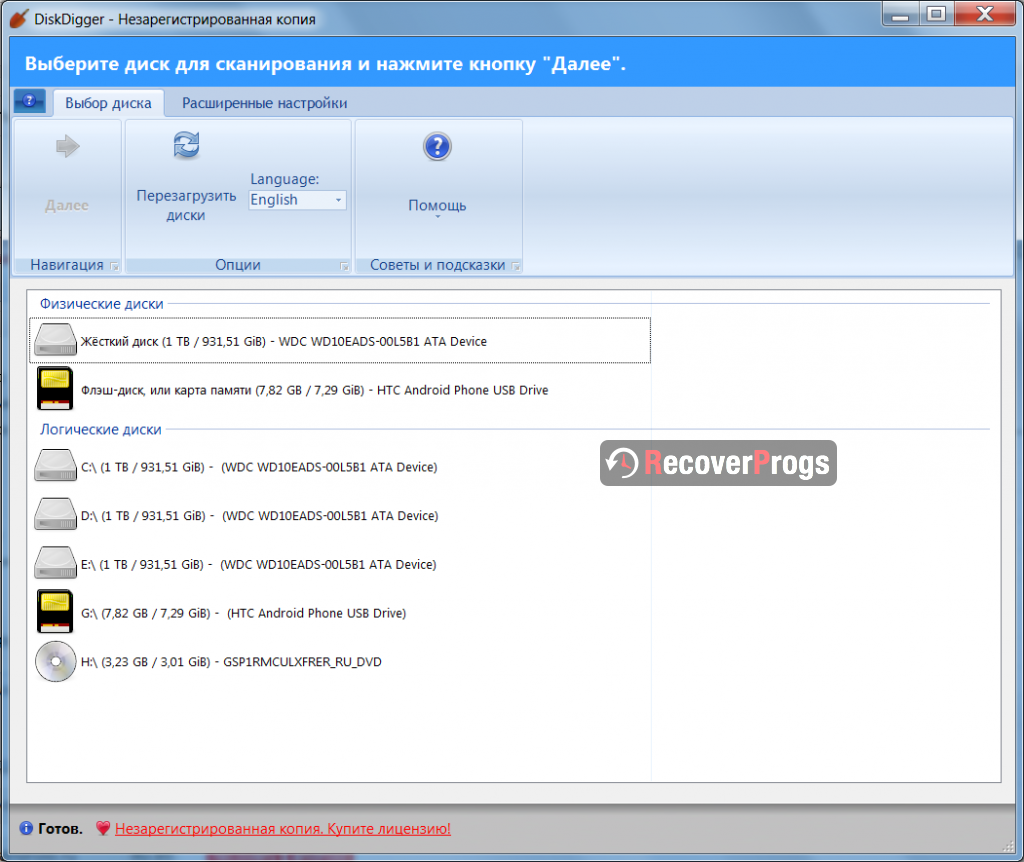
- Launching DiskDigger and Selecting a Drive: First, you’ll open DiskDigger and select the drive or partition you want to scan. This could be your internal hard drive, an SD card, or a USB drive. DiskDigger will present a list of available drives, clearly labeled.
- Choosing a Scan Type: DiskDigger offers different scan types, such as a quick scan (for recently deleted files) and a deep scan (more thorough but time-consuming). The choice depends on your needs and how confident you are about the location of your lost data.
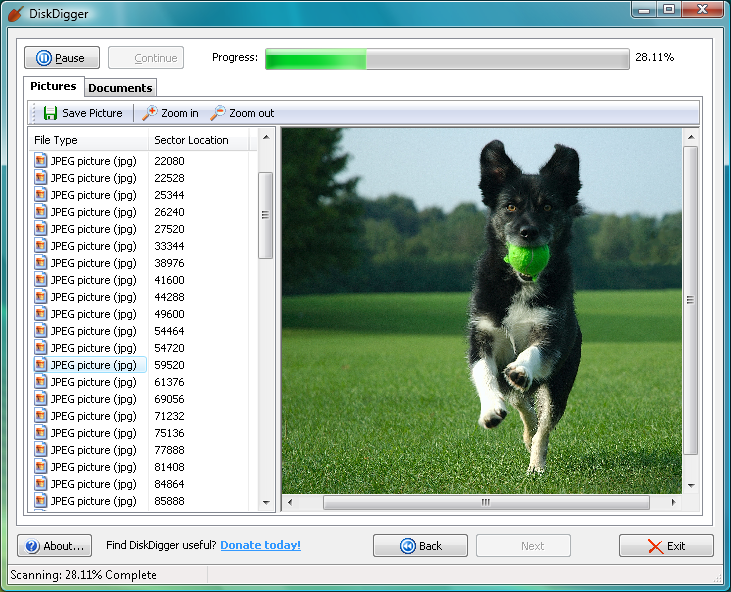
- Initiating the Scan: Once you’ve selected your scan type, DiskDigger begins the scanning process. The duration varies depending on the size of the drive and the chosen scan type. A progress bar will typically display the scan’s progress.
- Reviewing and Selecting Files: After the scan completes, DiskDigger displays a list of recoverable files, categorized by file type (images, videos, documents, etc.). You can preview some files (like images) before recovering them. Select the files you want to recover.
- Recovering Files: Finally, choose a recovery location (typically a different drive or folder than the one being scanned to avoid overwriting potential data) and initiate the recovery process. DiskDigger will copy the recovered files to your selected location.
Recovering a Deleted Image File
Let’s walk through a specific example of recovering a deleted image file using DiskDigger. This process highlights the typical workflow and decision points encountered during a data recovery operation.
- Identify the Drive: First, you’ll launch DiskDigger and select the drive (e.g., “D:”) containing the deleted image file.
- Select Deep Scan: Because the image file has been deleted, we opt for a “Deep Scan” to maximize our chances of finding the file’s fragments.
- Initiate Scan: The deep scan will begin. This could take some time, depending on the drive’s size and the number of deleted files.
- Locate the Image: Once the scan is complete, navigate through the “Images” category. DiskDigger will display thumbnails if available. Locate the deleted image by its name or thumbnail.
- Recover the Image: Select the image file and choose a recovery location (a different drive or folder). Click “Recover” to save the image to your chosen location.
Factors Influencing Recovery Success
Several factors can impact the success rate of data recovery using DiskDigger. Understanding these factors helps manage expectations and optimize the recovery process.
- Time Since Deletion: The sooner you attempt recovery after deletion, the higher the chances of success. Overwriting the deleted space reduces the chances of successful recovery.
- Type of Deletion: A simple delete operation usually leaves more recoverable data than a secure delete or format operation which often overwrites the data multiple times.
- Drive Health: A failing hard drive or corrupted storage medium can significantly reduce the likelihood of successful recovery. Bad sectors or physical damage can prevent access to the deleted file’s fragments.
- Scan Type: A deep scan is more thorough but also takes longer. A quick scan might miss some deleted files.
- File Fragmentation: If the deleted file was highly fragmented before deletion, recovery becomes more challenging. Recovering highly fragmented files often results in corrupted or incomplete files.
DiskDigger Data Recovery Process Flowchart
A visual representation of the data recovery process can be helpful. Imagine a flowchart starting with “Launch DiskDigger,” branching to “Select Drive,” then “Choose Scan Type” (Quick or Deep). The next step is “Initiate Scan,” leading to “Review and Select Files.” Finally, the flowchart ends with “Recover Files” to the chosen location. Each decision point (like scan type selection) influences the subsequent steps and overall outcome.
DiskDigger’s Pros and Cons
DiskDigger, while a powerful data recovery tool, isn’t a perfect solution for every situation. Like any software, it has its strengths and weaknesses, and understanding these is crucial for determining if it’s the right choice for your data recovery needs. This section will delve into the advantages and disadvantages of using DiskDigger, focusing on the differences between the free and pro versions and its performance across various operating systems.
Advantages of DiskDigger
DiskDigger offers several key advantages. Its ease of use makes it accessible to even novice computer users, requiring minimal technical expertise. The free version provides a surprisingly robust set of features, allowing users to recover a significant number of files without paying. Its cross-platform compatibility means it can be used on Windows, macOS, and Android devices, offering broad accessibility.
Finally, its relatively lightweight nature means it doesn’t consume excessive system resources during the scanning process, making it suitable for use on less powerful machines.
Disadvantages of DiskDigger
While DiskDigger is effective, it also has limitations. The free version’s recovery capabilities are restricted; it may not recover all file types, and the preview function is limited. The pro version, while offering expanded functionality, comes at a cost. The recovery process, while generally straightforward, can be time-consuming, especially when dealing with large storage devices or heavily fragmented data.
Furthermore, the success rate of recovery isn’t guaranteed, and the quality of recovered files can sometimes be affected by the extent of data corruption.
Free vs. Pro Version Limitations
The core difference between DiskDigger’s free and pro versions lies in their functionality. The free version offers basic scanning and recovery of common file types, but it restricts the preview function and lacks support for certain file formats. The pro version unlocks advanced features such as a deeper scan, more comprehensive file type support, and the ability to preview files before recovery, significantly improving the chances of successful recovery and reducing the risk of recovering corrupted files.
DiskDigger’s a lifesaver for recovering lost files, but sometimes you need the full power of Microsoft Office to properly organize and edit those recovered documents. If you need to upgrade your software, consider checking out where to buy Microsoft Office to make the most of your recovered data. After all, DiskDigger just gets the files back; you still need the right tools to work with them effectively.
Think of it like this: the free version is like a basic metal detector – it finds some things, but the pro version is more like a sophisticated sonar system – it finds much more, and lets you get a better look before you pull it out.
DiskDigger Performance Across Operating Systems
DiskDigger’s performance can vary slightly depending on the operating system. While generally consistent across Windows, macOS, and Android, factors such as the system’s processing power and available RAM can influence scan speed and overall efficiency. On less powerful devices, the scanning process might take longer. However, the software’s design is generally optimized for performance across different platforms, minimizing noticeable differences in functionality.
In essence, while the underlying code might be slightly different, the user experience remains largely consistent.
Situations Where DiskDigger Might Be Unsuitable
DiskDigger isn’t a magic bullet. It might be unsuitable in situations where data has been overwritten extensively, where the storage device is physically damaged, or where sophisticated data encryption is involved. For instance, if you’ve formatted your hard drive multiple times after losing your data, the chances of successful recovery are drastically reduced. Similarly, if your hard drive has sustained physical damage (e.g., a dropped hard drive with a damaged platter), DiskDigger might not be able to access the data at all.
In these cases, professional data recovery services with specialized equipment might be necessary.
Security and Privacy Implications: Diskdigger
Data recovery software, while incredibly useful for retrieving lost files, introduces potential security and privacy concerns. Using tools like DiskDigger requires careful consideration of the risks involved, especially regarding the sensitive nature of the data that might be recovered. Understanding these implications and taking appropriate precautions is crucial for responsible usage.DiskDigger’s operation inherently involves accessing and potentially reconstructing deleted files.
This means that if your device contains sensitive personal information, such as financial records, medical data, or private communications, there’s a risk of this information being exposed during the recovery process. Furthermore, malicious actors could potentially use data recovery tools to access information from compromised devices, highlighting the need for strong security practices.
Data Exposure Risks, Diskdigger
Recovering deleted files, even seemingly innocuous ones, could inadvertently expose sensitive information. For example, recovering a seemingly harmless deleted image might reveal metadata containing location data, which could compromise privacy. Similarly, recovering a deleted document could expose draft versions containing confidential information that was previously removed. These scenarios emphasize the importance of carefully considering the potential privacy implications before initiating a data recovery operation.
DiskDigger’s Data Protection Measures
DiskDigger itself does not actively attempt to steal or misuse your data. The software primarily focuses on file recovery, not data analysis or surveillance. However, the process of recovering files necessitates temporary storage of that data on your system or device. It is important to note that DiskDigger does not encrypt data during the recovery process. Therefore, strong device security, such as a strong password and up-to-date operating system, are essential to mitigate the risk of unauthorized access.
Secure Disposal of Recovered Data
Once you’ve recovered your desired files, securely deleting the recovered data is critical. Simply deleting files through your operating system’s file manager isn’t sufficient, as the data may still be recoverable using specialized tools. To securely erase recovered files, you should use data wiping software that overwrites the data multiple times, making recovery virtually impossible. Such tools are readily available for various operating systems.
Alternatively, for particularly sensitive data, physical destruction of the storage medium (like securely shredding a hard drive) is the most effective method.
Troubleshooting Common Issues
DiskDigger, while generally user-friendly, can sometimes throw curveballs. Understanding common problems and their solutions can save you time and frustration. This section Artikels typical issues encountered and provides straightforward solutions to get you back on track with your data recovery. We’ll also explore ways to optimize DiskDigger’s performance for smoother, more efficient recovery.
Common DiskDigger Errors and Solutions
Troubleshooting DiskDigger often involves understanding the root cause of the problem. Is it a software issue, a hardware problem, or something else entirely? This table summarizes common errors and their corresponding solutions.
| Error | Solution |
|---|---|
| DiskDigger fails to detect storage devices. | Ensure the device is properly connected and recognized by your operating system. Check device drivers and restart your computer if necessary. Try different USB ports or cables. If the device is an external hard drive, make sure it’s powered correctly. |
| DiskDigger reports “No files found.” | This could be due to several factors: The files may have been overwritten, the device may be severely damaged, or the file system may be corrupted. Try different scan options within DiskDigger (e.g., deep scan). If the device is a memory card, consider using a card reader rather than directly connecting it to the device. |
| DiskDigger crashes or freezes during the scan. | This could indicate insufficient system resources (RAM or processing power). Close unnecessary applications, restart your computer, and try running DiskDigger again. Consider increasing the amount of RAM available to your system if possible. A faulty or corrupted installation of DiskDigger may also cause this; reinstalling the software may be necessary. |
| Recovered files are corrupted or unreadable. | File corruption can happen due to severe data damage. Try different file repair tools after recovering the files. The original file might be beyond repair, especially if significantly overwritten. A deeper scan might recover more data but might also increase the chances of retrieving corrupted files. |
| Slow scan speeds. | Large storage devices and deep scans take a considerable amount of time. Ensure sufficient free space on your hard drive, close other applications to free up system resources, and be patient. A slower storage device (like an older hard drive) will naturally result in longer scan times. |
Optimizing DiskDigger Performance
To enhance DiskDigger’s efficiency, consider these optimizations. Sufficient system resources are crucial for a smooth and speedy recovery process. Prioritizing DiskDigger’s use of system resources will lead to improved performance.Prioritizing DiskDigger’s resource allocation involves closing unnecessary applications running in the background. This ensures that DiskDigger has sufficient processing power and RAM to conduct scans effectively. For instance, closing a web browser with multiple tabs open, or a resource-intensive game, can significantly improve scan speeds.
Furthermore, ensuring your computer has adequate free hard drive space will help prevent performance bottlenecks during the recovery process. A rule of thumb is to have at least twice the amount of free space as the size of the device being scanned.
System Requirements and Compatibility
DiskDigger, while generally a lightweight application, still has minimum system requirements to ensure smooth operation and successful data recovery. Its compatibility varies depending on the specific version and the target operating system. Understanding these requirements is crucial before attempting data recovery to avoid unexpected issues.DiskDigger’s compatibility spans several operating systems and devices, but certain versions may only support specific platforms.
Older versions might lack features or optimizations present in newer releases. Additionally, certain hardware configurations, particularly older or less powerful devices, may experience performance limitations during the recovery process.
Minimum System Requirements
DiskDigger’s minimum requirements are modest, making it accessible to a wide range of users. Generally, a relatively recent operating system and a small amount of available RAM are sufficient. However, the exact specifications depend on the version and the chosen recovery method (basic scan vs. deep scan). Deep scans, naturally, require more resources.
For instance, attempting a deep scan on a severely fragmented drive with limited RAM might lead to slowdowns or even crashes.
Operating System and Device Compatibility
DiskDigger offers versions for both Android and Windows. The Android version is designed for recovering data from internal and external storage on Android devices, while the Windows version supports a broader range of storage media, including hard drives, SSDs, and USB drives. Compatibility with other operating systems like macOS or Linux is not directly supported by official DiskDigger releases.
While some users might find ways to run it through emulation or other workarounds, official support is limited to Android and Windows.
Known Compatibility Issues
While generally stable, some users have reported compatibility issues. These issues often stem from outdated drivers, conflicting software, or insufficient system resources. Problems can manifest as application crashes, slow performance during scans, or failed recoveries. Keeping your drivers updated and ensuring sufficient free disk space can often resolve these issues. Also, running DiskDigger as an administrator (on Windows) can sometimes help overcome permission-related problems.
System Requirements by Version
The following table Artikels the approximate system requirements for different versions of DiskDigger. Note that these are estimates, and actual requirements may vary slightly depending on specific hardware and software configurations.
| OS | Version | Requirements |
|---|---|---|
| Android | 1.0 – 1.5 | Android 4.0 or higher, 512MB RAM (minimum), 100MB free storage |
| Android | 2.0 – Present | Android 5.0 or higher, 1GB RAM (recommended), 200MB free storage |
| Windows | All Versions | Windows 7 or higher, 1GB RAM (minimum), 500MB free storage |
Alternative Data Recovery Tools
DiskDigger’s a solid choice for data recovery, but it’s not the only game in town. Several other tools offer similar functionality, each with its own strengths and weaknesses. Choosing the right one depends on your specific needs and technical comfort level. Let’s explore some popular alternatives and compare them to DiskDigger.
Comparison of Data Recovery Tools
The following table compares DiskDigger to three other popular data recovery tools: Recuva, PhotoRec, and EaseUS Data Recovery Wizard. These tools vary in features, ease of use, and overall effectiveness, making it crucial to understand their differences before making a selection. The effectiveness of any recovery tool can also depend on factors like the type of data loss, the condition of the storage device, and the time elapsed since the data loss.
| Feature | DiskDigger | Recuva | PhotoRec | EaseUS Data Recovery Wizard |
|---|---|---|---|---|
| Ease of Use | User-friendly interface, good for beginners. | Intuitive interface, relatively easy to use. | Steeper learning curve, command-line interface available, more technical. | User-friendly interface with a wizard-like approach, suitable for beginners. |
| Supported File Systems | FAT12/16/32, NTFS, exFAT | FAT12/16/32, NTFS, exFAT | Wide range of file systems, including NTFS, FAT, ext2/3/4 | NTFS, FAT12/16/32, exFAT, ext2/3/4, HFS+ |
| File Types Supported | Wide range, including images, videos, documents, and more. | Wide range, similar to DiskDigger. | Primarily focuses on image recovery but can recover other file types. | Very wide range, supports a large variety of file types. |
| Recovery Performance | Generally good performance, especially for recently deleted files. | Comparable performance to DiskDigger. | Can be slower than other tools, but effective for deeply damaged drives. | Generally good performance, but can be resource-intensive. |
| Pricing | Free (with limitations), paid version available. | Free (with limitations), paid version available. | Open-source and completely free. | Primarily paid, with a limited free version. |
| Advantages | Easy to use, good for beginners, free version available. | Intuitive, good recovery rates, free version available. | Open-source, supports many file systems, free. | Powerful, wide file type support, user-friendly. |
| Disadvantages | Free version has limitations, may miss some files. | Free version has limitations, some advanced features require the paid version. | Steeper learning curve, can be slow. | Paid software, can be resource-intensive. |
Recuva: A Closer Look
Recuva is another popular data recovery tool known for its user-friendly interface and relatively high success rate. While it shares similarities with DiskDigger in terms of ease of use and supported file types, Recuva’s deep scan feature is particularly helpful for recovering files that have been deleted a while ago or overwritten. However, the free version has limitations, and the full functionality requires purchasing a license.
PhotoRec: A Command-Line Powerhouse
PhotoRec, on the other hand, is a command-line-based tool that’s exceptionally powerful, particularly for recovering image files. Its strength lies in its ability to recover data from severely damaged storage devices where other tools might fail. However, its command-line interface makes it less accessible to beginners. Its open-source nature means it’s completely free to use.
EaseUS Data Recovery Wizard: Comprehensive and Powerful
EaseUS Data Recovery Wizard is a comprehensive tool boasting a user-friendly interface and support for a vast range of file types and file systems. It offers powerful features like previewing recoverable files before recovery and the ability to recover data from various storage devices. However, it’s primarily a paid application, with a limited free version. The paid version offers more advanced features and greater recovery capabilities.
Advanced Usage Techniques

DiskDigger’s basic functionality is pretty straightforward, but digging deeper reveals powerful features that significantly improve your chances of recovering lost data. Mastering these advanced techniques can transform you from a casual user into a data recovery pro. This section will explore how to leverage DiskDigger’s more nuanced options for better results.
The key to successful data recovery often lies in understanding your data and adapting your recovery strategy. DiskDigger offers several ways to customize your searches, increasing the likelihood of finding what you need.
Deep Scan Functionality
Deep scans are DiskDigger’s secret weapon for recovering files that have been thoroughly deleted or overwritten. Unlike a quick scan, which only examines the file system’s directory structure, a deep scan meticulously analyzes the raw disk data, searching for file signatures to identify recoverable files. This process is considerably slower but yields a much higher chance of recovery, especially for files that have been completely removed.
Consider a scenario where you accidentally formatted your SD card – a deep scan is your best bet for retrieving those precious vacation photos. The trade-off is time; deep scans can take hours, even days, depending on the size of the storage device.
Custom File Type Selection
Instead of recovering everything, you can focus DiskDigger’s efforts by specifying the file types you’re interested in. This dramatically reduces scan time and filters out irrelevant results. For example, if you’re only looking for images, select only JPG, PNG, GIF, etc. This targeted approach is incredibly useful when dealing with large drives or when you have a specific type of file in mind.
Imagine recovering only your crucial Word documents from a cluttered hard drive; selecting only “.doc” and “.docx” significantly speeds up the process and makes finding the important files easier.
Command-Line Options (If Applicable)
While DiskDigger’s graphical interface is user-friendly, some versions might offer command-line options for advanced users. These options allow for automated scans, batch processing, and more control over the recovery process. Although specific options vary depending on the version, typical command-line functionality might include specifying the drive letter, output directory, and file types. This automated approach is beneficial for scripting data recovery processes or integrating DiskDigger into larger workflows.
For instance, a system administrator might use command-line options to automatically recover specific file types from multiple devices.
Techniques for Improving Recovery Success
Several techniques can significantly improve the chances of a successful data recovery. First, stop using the affected device immediately after realizing data loss to prevent overwriting. Second, avoid running any disk optimization or defragmentation tools on the affected drive. Third, use a separate storage device for saving recovered files to prevent potential data corruption or overwriting. Finally, performing a deep scan, as previously discussed, drastically increases the likelihood of finding lost data.
Consider a case where a user accidentally deleted important project files. By immediately ceasing all activity on the drive and opting for a deep scan, the user greatly increases their chances of restoring the lost files.
Advanced Usage Scenarios
Imagine a scenario where a user’s laptop hard drive fails. Using DiskDigger’s deep scan functionality and custom file type selection, focusing on “.docx” and “.xlsx” files, the user successfully recovers critical work documents, even after several attempts at standard recovery methods failed. Another example involves a photographer who accidentally formatted their memory card. By employing DiskDigger’s command-line options (if available), the photographer can automate the recovery of RAW image files, preserving the integrity of their work.
Ultimate Conclusion
So, there you have it – a comprehensive look at DiskDigger, a tool that’s surprisingly capable and surprisingly user-friendly. While no data recovery software is a guaranteed win, DiskDigger offers a solid chance of getting your lost files back. Remember to always back up your important data regularly to avoid these situations in the future! But if disaster strikes, now you’ve got the knowledge to fight back with DiskDigger.
Happy recovering!
FAQ Overview
Can DiskDigger recover files from an external hard drive?
Yep! DiskDigger works with a wide range of storage devices, including external hard drives, USB drives, and SD cards.
Is the free version of DiskDigger limited?
The free version has limitations on the file types and sizes it can recover. The pro version removes these restrictions and adds more features.
How long does a deep scan take?
That depends on the size of the drive being scanned. It can take anywhere from a few minutes to several hours, or even longer for very large drives.
What should I do if DiskDigger finds nothing?
Try a different recovery tool, or consider professional data recovery services. The files might be beyond recovery.
Can I recover encrypted files with DiskDigger?
The success rate depends on the encryption method. Some encryption methods might make recovery extremely difficult or impossible.